Friday, June 29, 2012

ABC Discovery Bottle - Toddler Style!

Our Little Man is totally in love with the idea of discovery bottles recently.  Unfortunately, most of them (typically made with rice) are still just a bit beyond what he is able to handle independently.  He will get a glimpse of an object and try to shake the bottle to see it better, only to cover the object up completely.  It frustrates him pretty well!  I decided what he needs is a base material with which to fill the bottle that will allow the objects to filter to the top better.  So, I started thinking larger, denser grains or pieces and this week I played with a variety of materials as well as searching for the perfect bottle.

Here is what I came up with for Little Man's new alphabet discovery bottle...


A VOSS plastic water bottle
and 
unpopped popping corn!


The bottle is a perfect cylinder, making it much easier to see what's inside.  Yay for being able to tell what you're looking at!   And the corn is large and dense enough to settle to the bottom, allowing the items to rise to the top quickly when shaking the bottle...and there's always A LOT of shaking!   =)

The procedure is pretty straight forward but a lot of fun...And LM even got to help! 

-Clean and dry the bottle
(very important to make sure there is no moisture left!)
-Peel all the labels off the bottle
(I figured out that if you peel VERY slowly and STRAIGHT down the bottle, every bit of the adhesive will come off perfectly clean...Little Man's uncle will be very proud of my success with this!)
-Add the corn and items for searching
(Little Man seriously enjoyed this step...picture to come.)
 -Line the top with hot glue, screw the lid back on, and you're good to go!
(Wait a good hour before playing with the bottle to make sure the glue is completely cool and dry.)

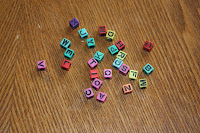
Our alphabet beads
Our finished bottle


We have an out of town trip coming up, so I'm looking forward to
 taking this bottle with us to help keep LM busy in the car. 
So far, he stays focused for quite a while looking for letters
(especially when I ask him to find a specific letter!  =) 

So...a little experimentation and we have a toy that makes a lot of fun noise when shaken, fosters growth in LM's patience AND gives him the opportunity for letter identification practice! 
What more could a mom ask for?

Creations by Kara

Thursday, June 14, 2012

Busy Bag Exchange: Felt Sandwiches and Counting Beans

We pulled out the next two activities from our busy bag exchange today.  While I was making dinner, Little Man stayed busy counting beans and making peanut butter, tomato, and salami sandwiches for Daddy...that's right...anyone who says peanut butter and salami do not a delicious sandwich make, has never had one made by this adorable little chef...
LM showing off the final sandwich he made for Daddy's dinner.
When Daddy got home from work he thoroughly enjoyed his PB, jelly,
salami, lettuce, tomato, cheese (two kinds), and bacon sandwich!   =)
Bacon makes everything delicious.  Right?


Felt Sandwiches

The pieces were quite durable and even had decorative
stitching to make them more realistic.
Click here to see more stuff sewn by the creator of this bag!  
The felt sandwich activity included two slices of bread (extra thickness created by sewing two pieces of felt together), two slices of tomato and bacon; and one piece each of salami, lettuce, swiss cheese, american cheese, grape jelly and peanut butter.  The objective is to give the child an opportunity for imaginary play and practice with practical life skills.  I even began giving LM recipes/sandwich orders for sandwiches with only peanut butter, or only lettuce and salami for example. 


Counting Beans

The Counting Beans activity included flashcards with the numerals 1 through 10 on one side and the correlating number of stickers on the opposite side as well as a handful of dry beans for counting. The objective is for the child to practice counting with the numerals and stickers to improve both number recognition and counting skills.  By counting the stickers and placing a bean on each one in a "one-to-one" matching process, LM was learning more about his numbers and counting in a "hands-on" or kinesthetic way.  This made him very intense...but happy!  =)

See...intense.  Serious work when the pinky is out.

He was extremely proud of his success though!  =)

Friday, June 8, 2012

Busy Bag Exchange: Ribbon Snake, Felt Clothesline, Pompom Patterns and a Little Bit of Vygotskian Theory

Little Man had a blast today trying out three new activities from the first round of our Busy Bag Exchange!  Today we created a ribbon and felt snake, attempted to hang felt clothes from a clothesline and matched patterns with pom poms of different sizes and colors.  LM is enjoying the activities and I can already see his attention span and patience improving when he sits down to work on one of them. 

I also found it quite interesting how these activities are bringing out so much of my training and experience in the classroom as well.  For those of you Vygotskian theorists, I was thinking a lot about where Little Man's "zone of proximal development" is with each of the activities, and how I could scaffold the tasks to make them more manageable for him.  I know I'm an education geek, but it was a lot of fun.   =)

 Ribbon Snake

The ribbon snake is made from a length of ribbon with a felt square sewn onto one end and large button onto the opposite end.  Included in the bag were a variety of colorful squares of felt with a "button size" hole cut in the middle. 
The objective is for the child to practice their buttoning skills by fitting the button through the hole and stacking the felt pieces onto the ribbon. 

This activity definitely put Little Man's patience to the test.  Although, even when he struggled, he was still enjoying it.  This activity seemed to fall well within LM's "zone of proximal development."  He was unable to complete it independently, but after some demonstration and my help with actually pushing the button through the hole, he began to get it.  He was so proud of himself each time he managed to add a felt square to the ribbon and in the end we had a pretty sweet looking felt snake with a button tongue!
Choosing just the right piece to add next...

LM diligently focusing on getting the button through the hole.
He was NOT giving up!

Felt Clothesline


The felt clothesline activity bag included an adorable array of felt clothes shapes, a set of clothespins, and a length of clothesline.  The objective of this activity is for the child to practice using the clothespins to pin the clothes to the line.  Little Man had a very difficult time with this one.  Even with my assistance and guidance, he wasn't able to attach the clothes to the line.  Instead, we started with practicing the basic components of the activity, and we'll work our way up to it eventually!  This scaffolding is a big part of Vygotsky's theories, and has always proven invaluable in my experiences.

Phase One:  Learning how to use the clothespin. 
After a little practice, he was even able to attach the pin to the felt sock!


Phase Two: Learning how to clip the clothespin to the clothesline.
Little Man REALLY liked this part.  And of course, we had to count how many pins he had attached!
In a few days we may be moving on to attaching the clothes TO the line.


Pompom Patterns

The pompom pattern activity bag came with an assortment of pompoms in all colors and sizes.  It included a play mat with printed colored circles to match the pompoms.  The objective is for the child to match the size and shape of the pompoms to the circles shown on the paper.  Eventually this activity will be extended into patterning, having the child complete a given pattern with different sizes or colors of pompoms.

Little Man enjoyed this activity and it seems to be a good independent activity for a two year old.  He required very little assistance from me, aside from requesting "more biggie reds!"  =)

Wednesday, June 6, 2012

Busy Bag Exchange: Texture Matching Game

Woohoo!  We have officially completed the first round of our Metro Detroit toddler busy bag exchange!  Nineteen moms creating an activity for each other member of the group.  On our exchange day, everyone came together to share their activity and returned home with a bag full of a variety of activities for their little ones to enjoy.  I was so happy with and impressed by the dedication these women had for making fun and educational activities!  In the next few days, I will share an overview of the bags that were shared as my Little Man explores his new "games" (as he calls them.)

Here is an explanation of the Texture Matching activity I created for the exchange.  It is based on the Montessori activity demonstrated here.

I used plastic chips as the base and cut similar size circles from eleven different materials (a variety of fabric, paper, foil, sandpaper, felt, etc.)  Thankfully, my 1 3/8" paper punch made quick work of cutting quite a few of the materials!  I used simple white glue to attach the circles to the plastic chips. 
Each activity set included two discs of each texture.  As long as you run your finger along the surface of the materials in a circular motion, most textures are fairly easy to determine. 


The set can be used to match textures in the following ways: with eyes open and textures face up, with eyes closed and textures face up, or with textures face down as a "memory" style matching game.  It can also be used to discuss texture words as well.
 
Blog Template by suckmylolly.com : Header Image by Roctopus