Monday, July 16, 2012

Our First Toddler Cloud Study

I've had quite a bit of training in interest based learning throughout my years of teaching elementary and middle school, and yet, I was still caught off guard when I saw this lesson unfolding right before my eyes, all at Little Man's request!  I had planned a day of playing outside, lunch with Daddy and visiting the library, but after only a few minutes in our backyard, most of my plans changed.  Little Man looked up at the sky, pointed to the clouds above and said "Mommy I see a doggie!" 

We have a family friend who previously taught LM how to lay in the grass and watch the clouds.  I guess he get more from it than I realized!  Our next half hour or so was spent laying in the grass, staring up at the cloud filled sky, talking about clouds and the shapes we saw in them.

Here is a picture of "the doggie" Little Man saw in the clouds.  Being just over two years old, he couldn't help me see it, but he definitely convinced me it's there!


As you may be able to tell, we live in a rather urban environment
and our view of the sky is rarely unobscured by wires.

When we finally decided to head back in the house, we continued our Cloud studies with the following activities:

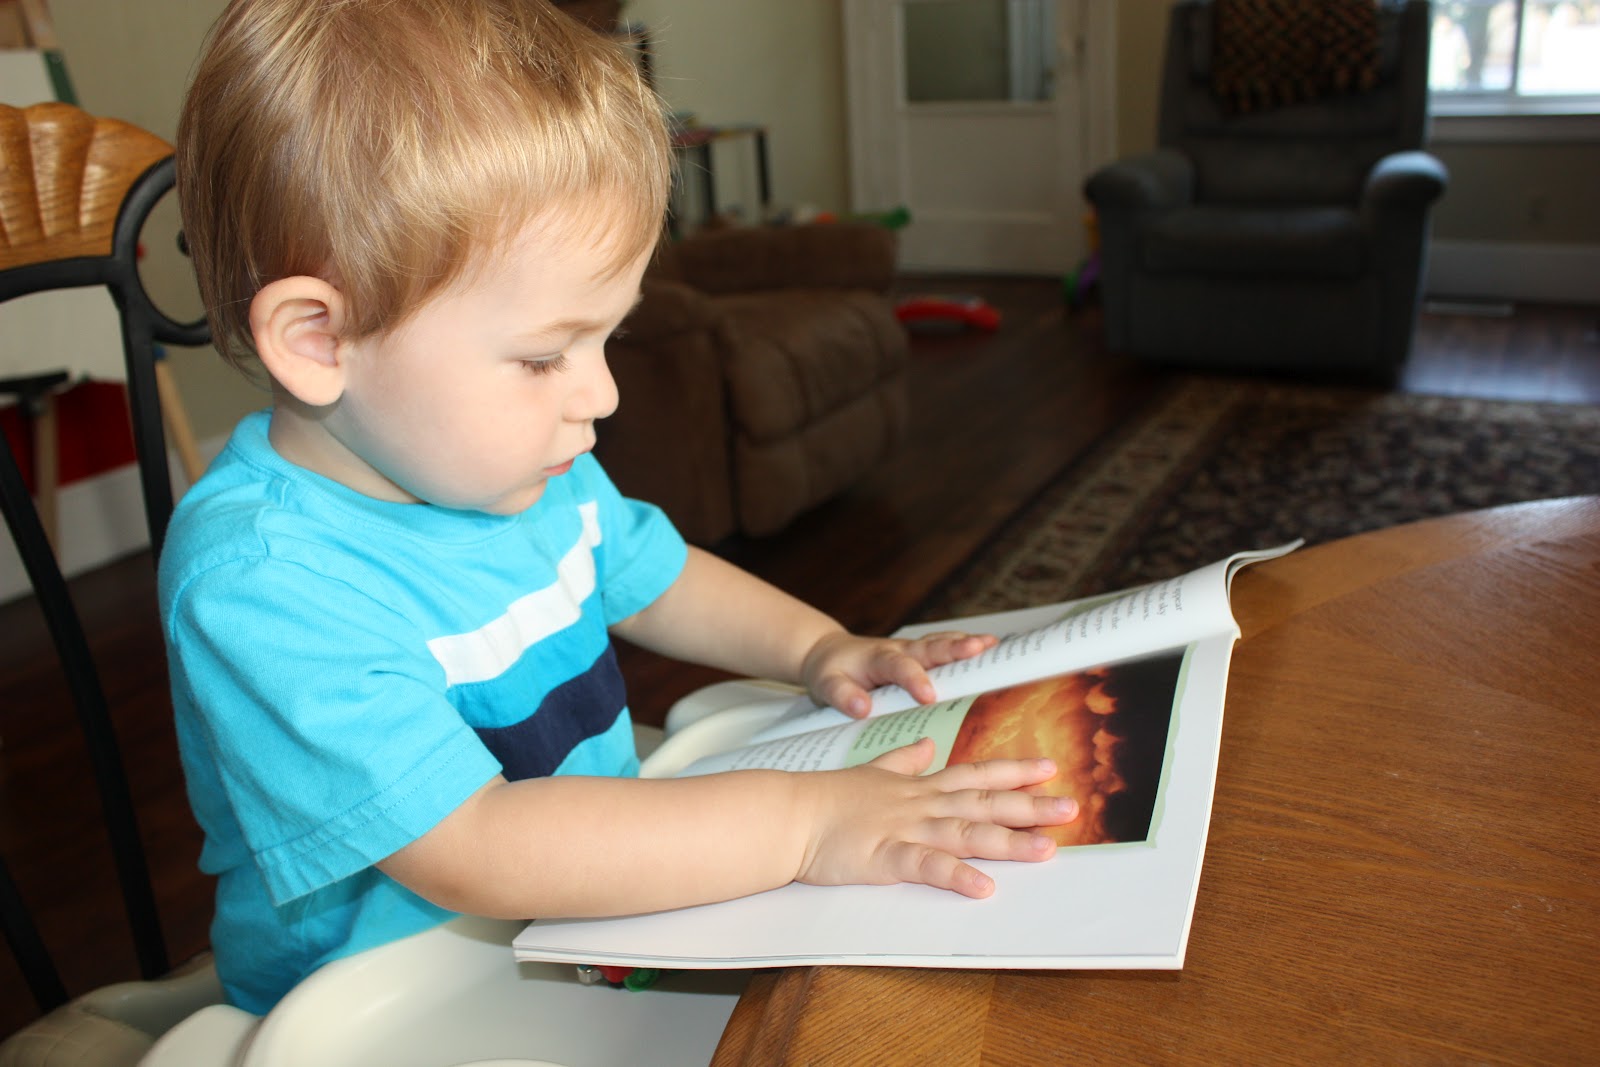
We have recently started having school time at the dining room table, and Little Man gets excited every time I mention it.  Here he is climbing into his chair asking "School time mommy??"  Of course, he brought Henry and Thomas to learn about clouds as well!


Little Man has always been partial to books with real life photos as the illustrations so, we looked through the book Clouds by Trudi Trueit. I read parts of the text and we talked about the photos of the different types of clouds. 


Here is Little Man telling Henry about his "favorite" clouds from the book. I wish I had the video camera running for this moment!


He was very interested in the pictures of the storm clouds throughout the book. We talked about rain and snow as well and how those darker clouds are a sign that a storm is coming.


  We finished up by with this cloud art project:
 
The finished product!


This project allowed LM to practice his skills with holding scissors and cutting paper and gluing objects to paper.  We also continued to discuss clouds and the things he had learned from watching them outside and reading the book.

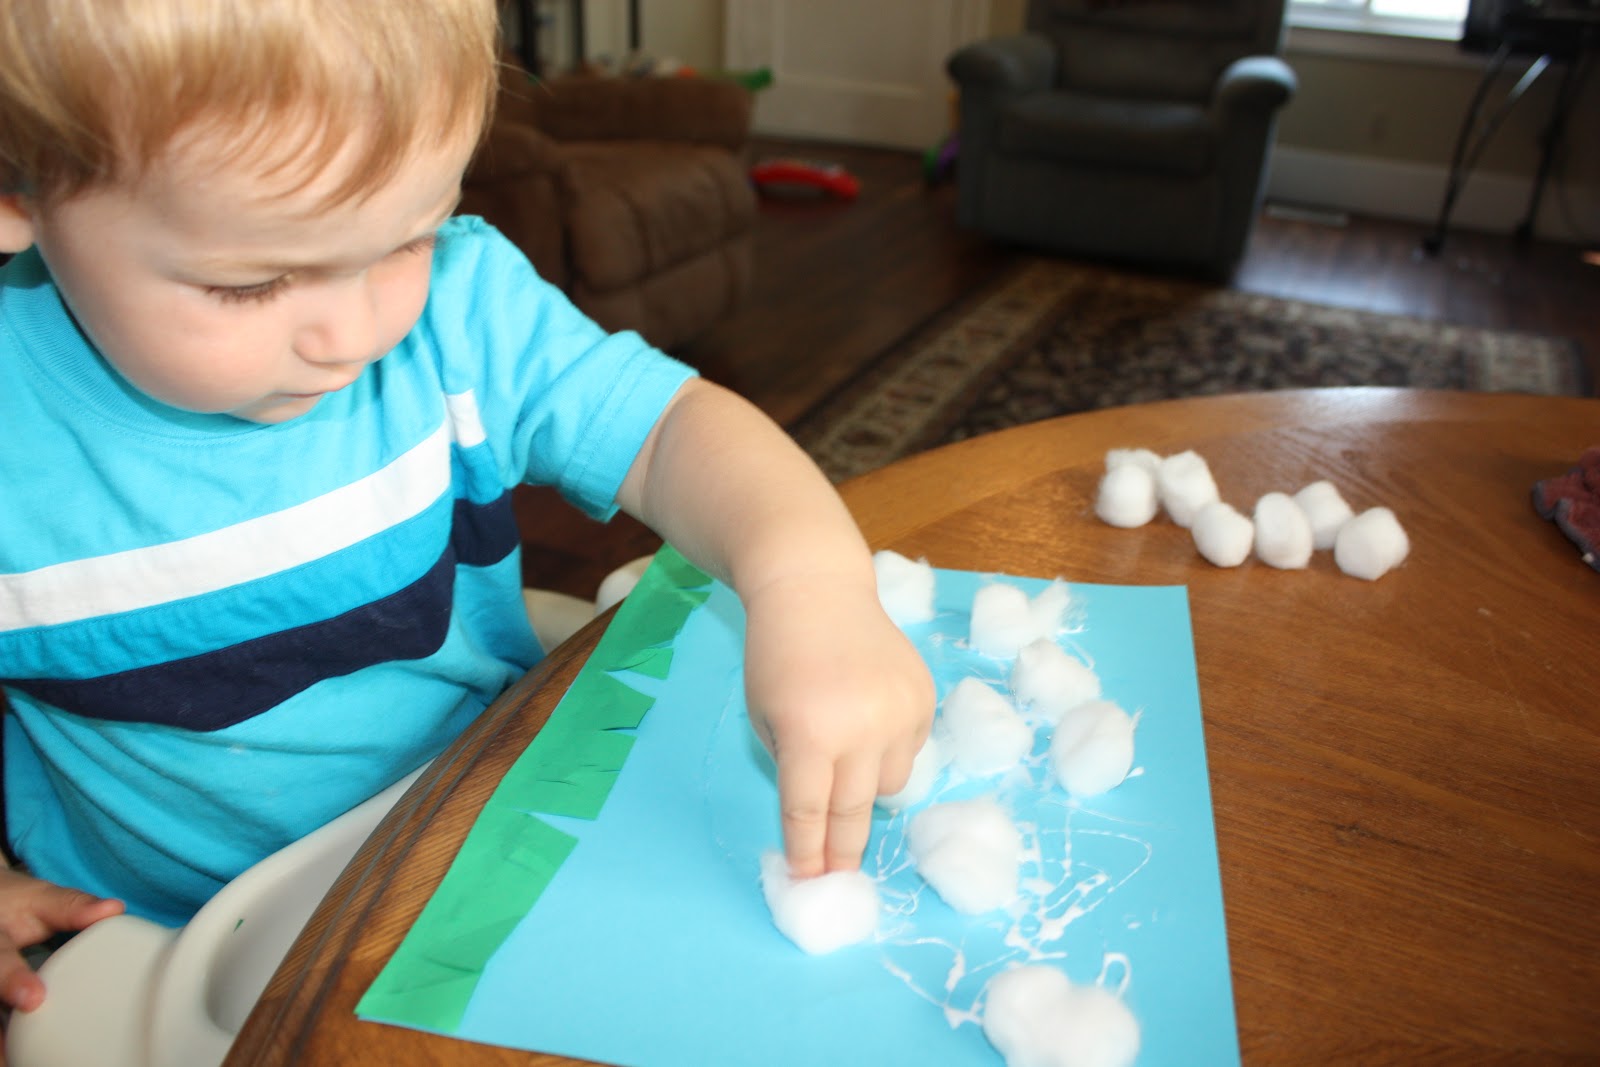
We started with a lot of cutting practice.  Little Man seriously LOVES using his scissors and he had a blast making the grass for his cloud picture.  He even made sure he showed Henry what he had made when he was done!


I cut one of his grass paper edges off the green, glued it to his sky paper, and then the real fun began!


Here are some pictures of the fun!  Little Man spread the glue on the paper (with a little help that he preferred not to have) and then started adding cotton balls to cover all the glue.  And he was extremely thorough!  He just couldn't leave one bit of glue showing...I guess I've rubbed off on him more than I thought.  And he's only two!  ;)


One Tasty Sunday: Molasses Banana Bread

We always have a bunch of bananas in our house...sometimes more than one.  Every time I go to the grocery store I always think "Hey, we need more bananas."  The problem is, a week later, it never seems to fail, I have a few left that are just too dark and too mushy to entice me to eat them.  Enter...banana bread.  I love it.  And I dare say, I have finally created my absolute favorite banana bread recipe.  Little Man and I just recently made some, and two entire loaves were devoured by us and some friends in exactly two days.  With this recipe, I'd say too many bananas will never be a problem again.  Introducing...

MOLASSES BANANA BREAD


Ingredients:

4 Cups of flour (your favorite kind)
1 1/2 Cup dark brown sugar
1 1/2 tsp baking soda
1 tsp salt
1/2 Cup banana yogurt
4 eggs
1/4 Cup molasses
3/4 Cup butter, melted then slightly cooled
3 tsp vanilla
6 bananas, mashed

Here is the absolutely beautiful part about this recipe...

Directions:
Preheat oven to 350 degrees.  Pour all the ingredients into a large mixing bowl.  Stir until combined.  Pour into two greased loaf pans.  Bake for approximately 60 minutes or until golden brown and a toothpick comes out clean from the center of the loaf.  Leave in the pan to cool. 

Because the recipe is so darn easy to make, it is a perfect treat to make with the kids.  So, here are some pictures of Little Man as sous chef once again. 

Learning how to use a potato masher...
we use this for anything and everything that needs to be mashed in our house!
If you are noticing the popcorn and variety of other things surrounding
Little Man on the counter, they are there because
he helped me collect all the ingredients we needed for the recipe. 

One of our cabinets at Little Man's height is stocked with food and baking ingredients that are safe for him to handle without breaking anything major or dangerous.  When we start cooking, I call out the items that we need from his cabinet and he gets it for us.  As you can tell from the plethora of extraneous ingredients on the counter, he still hasn't quite gotten the concept entirely.  But, he loves searching for the ingredients and bringing them to the counter, and he has learned the names of many new foods that way.  


Stirring all the ingredients together before putting the bread in the oven.

Little Man didn't ask to taste a single ingredient this time.  He probably learned that lesson quickly after the flour tasting while making Unky Bars.  Of course, though, he wanted a bite when he saw the bread come out of the oven!  He was amazed at the change the bread went through in the oven, and that gave us a wonderful opportunity to extend his knowledge about changes caused by heat.  He has a favorite episode of Sid the Science Kid about irreversible change and I'm expecting the next time he sees it, there will be some pretty cool "text to self" connections made.  I can't wait! 

Creations by Kara

**The original recipe I USED to make can be found here.

Friday, July 13, 2012

A Look at Little Man's Mega I-Spy Bottle...As Promised!

So, this may be the beginning of a new post category for us.  Let's call this The Amazing Adventures of Little Man and Daddy! 

Little Man spent an entire afternoon with his Daddy combing the house hunting for treasure.  This specific hunt was for the perfect items to add to their new MEGA I-SPY Discovery Bottle.  As they found things, we spread them out and took a photo of the booty.  Here is a pic of everything before adding it all to the bottle.  We are going to print this photo out as a checklist of what we should search for when playing the game. 


Little Man thought it was hilarious watching each of the items fall and hit the bottom of the bottle.  In fact, he enjoyed it so much, we had to dump everything out and let him put it all back in a second time!  Of course, Daddy took care of the items that were too small or a bit dangerous for LM to handle.  After all the items were in the bottle (for the second time,) we poured the rice in about three fourths of the way to the top of the bottle, glued the lid on, shook it up, and we were ready to play!

My pictures of Little Man and his dad completing the bottle didn't turn out.   =(    But, here are a few pics of LM playing his "new rice game" the following day.  I like that you can see the progression of him getting serious about finding the items.  It starts off pretty casual and by the end, he's pretty much on top of the bottle, as close as he can be!!  


After making the bottle with his dad, Little Man spent some time practicing his pouring skills with the left over rice. I have to say, he's getting much better at it.  The mess stayed pretty much on the plates, and I honestly don't think ALL the spills were accidental!   ;)


Sunday, July 8, 2012

One Tasty Sunday: Healthy PB and Banana Oatmeal Cookies

We have a playdate with a few of Little Man's friends tomorrow and thought these cookies would be the perfect snack to share!  I have used many cookie recipes in the past, but haven't managed to find one I like that has no added sugar or oil.  That means I need to create my own right?!?  Of course! 


So, these are my version of a healthy cookie.  No added sugar, oil, or eggs.  And Little Man LOVES them.  Actually, LM's Daddy does too, when they're drizzled with just a bit of honey.  YUM!!!  =)

PB and Banana Oatmeal Cookies


Makes Approximately 24 Cookies.


Ingredients:
1/2 Cup golden raisins
3/4 Cup peanut butter
1/3 Cup unsweetened applesauce
2 Large bananas, mashed
2 tsp vanilla
1 Cup old fashioned oats
1/2 Cup quinoa flour
3/4 Cup whole wheat flour
2 tsp. cinnamon
1 tsp. baking soda
1/2 tsp. salt

Directions:
1.  Preheat oven to 350 degrees.
2.  Soak raisins in warm water until they have plumped up.
3.  Combine peanut butter, applesauce, bananas and vanilla and set aside.
4.  Combine oats, quinoa flour, wheat flour, cinnamon, baking soda and salt.
5.  Slowly add dry ingredients to peanut butter mixture, stirring until completely combined.
6.  Fold raisins into batter.
7.  Drop large tablespoonfuls onto greased cookie sheets.
8.  Bake for 14 minutes or until browned on bottom of cookie. 
9.  OPTIONAL:  For a bit of added sweetness, drizzle with honey while warm and then allow to cool.


Creations by Kara

Friday, July 6, 2012

Magnetic Fun in a Bottle

Wow, with a sick kiddo, temps at 100+ degrees, storms to rival the storm of the century, and finally an ill timed July 4th blackout (complete with newly legalized fireworks), we have had just a small amount of craziness around here the past few days.  Thankfully though, the power is back on, and I feel like we might be settling back into our own little version of normalcy.

I myself have learned quite a bit over the last week from, how to make homemade HEALTHY granola bars (using this amazing recipe) to how to more efficiently keep my Pinterest boards organized.  Have I mentioned I LOVE Pinterest?  In point of fact, I may be addicted.

Anyway, I think the most important thing I learned this week was to remember that things will most likely never go EXACTLY how I planned them...and that's ok.  As I'm preparing for starting Little Man's "Learning at Home" routines in the next few months, it's probably going to be more important than ever for me to remember that!

So, as I said, we have electricity again (Yay for today's modern conveniences!  Right?) so now, I can start at the beginning...always a good place to start.  ;) 

A few days ago (on a day we were planning to be at the zoo) we were hit with the double whammy of BLAHdom.  Thunderstorms outside and a Little Man who wasn't feeling quite himself inside.  What to do?  What to do?  One can only read The Cat and the Hat and There's a Wocket in My Pocket (LM's current faves) so many times before running to the craft supplies quick, fast and in a hurry!

And there they were...the newly purchased magnetic wands Little Man has been exploring the house with for a couple days.  He enjoys sticking them to everything, testing whether or not they will "stay together."  If you read a couple posts back, you know he also has fallen in love with discovery bottles.  So, I thought, why not combine his current fascination with magnets and his interest in all things discovery bottle?  And lo and behold...we have...the Magnetic Discovery Bottle.  I found the original idea here...on Pinterest, of course!
THE FINISHED PRODUCT.

Here are a few pics of Little Man and his Daddy getting our newest Discovery Bottle up and running...

I cut up about 12 pipecleaners into 1 inch pieces and LM diligently made sure each piece went into a VOSS water bottle.
We glued the lid on for safety after adding all the pipecleaners and the magnetic "coins" that came with the wands.
Little Man was fascinated by the fact that he could move the pieces inside the bottle without actually having to touch them.  MAGIC!
They both had a lot of fun with this project, and in true Daddy fashion, Little Man's Daddy devised a plan to make a Giant I-Spy Discovery Bottle the next day.  Hopefully I will get pictures of that adventure up tomorrow sometime.  I'm thinking that after the past few days with Daddy, Little Man probably won't think it's so bad to be sick!   

Creations by Kara

Sunday, July 1, 2012

One Tasty Sunday...Making Unky Bars (AKA Super Cinnamon Blondies)

Welcome to our very first One Tasty Sunday post!  Today was Little Man's first time as sous chef in Mommy's kitchen.  Recently I found a recipe for Snickerdoodle Blondies at Your Homebased Mom that I have been dying to test.  LM's Uncle is a big fan of cinnamon toast and I felt, with a little tweaking, I could make these taste pretty close to the real thing.  So we gathered the ingredients and away we ran!  Of course, LM is still just barely two so, I threw in as much learning as I could along the way and we ended up with a lot of counting and learning the names of the ingredients.

 The original recipe was called Snickerdoodle Blondies.  My new version is Super Cinnamon Blondies since I definitely amped up the cinnamon, but mostly, thanks to Little Man, we now call them Unky Bars.   =)   We had a great time learning and playing through this recipe, and we can't wait to hear how much LM's Unky loves them.


Here is the shot I got of Little Man just after he strongly requested I let him taste the flour we were using...


And this is him trying to wipe his tongue clean...He gave me a look that asked, "Why did you let me do that Mom!?!?" 


And I have to say, I felt a little guilty about it.  But, he didn't demand a taste of anything else.  At least not until the bars came out of the oven!


Little Man stirring the dry ingredients. 
Rather than adding 2 whole cups of flour, we added 8 1/4 cups so LM could
practice counting, scooping, and dumping using the smaller measuring cup.

I love my KitchenAid Mixer, and so does Little Man.
He had a lot of fun watching it do its job, but also had the
responsibility of pouring and mixing the cinnamon chips.

I think patting down the dough into the pan was his favorite part though!
Let's hope Unky doesn't mind a few fingerprints!

Here is the finished product.  They turned out delicious.
No, not delicious...let's say HEAVENLY.
UNKY BARS  (AKA SUPER CINNAMON BLONDIES)

Bars:
2 2/3 cups all-purpose flour
2 tsp. baking powder
1 Tbsp. ground cinnamon
¼ tsp. ground nutmeg
½ tsp. cream of tartar
1 tsp. salt
2 cups brown sugar, packed
1 cup butter, at room temperature
2 large eggs, at room temperature
1 1/2 Tbsp. vanilla extract
1 2/3 cup cinnamon chips
Topping:
2 Tbsp. granulated sugar
1 Tbsp. ground cinnamon
pinch of nutmeg

-Preheat the oven to 350 degrees F.
-Spray a 9×13-inch pan with nonstick spray.
-Whisk together flour, baking powder, cinnamon, nutmeg, cream of tartar and salt and set aside.
-In a large bowl, cream together butter and brown sugar with an electric mixer (3 to 5 minutes).
-Mix in eggs, one at a time, then vanilla and keep beating until the mixture is smooth.
-Stir in flour mixture until well blended.
-Stir in cinnamon chips. 
-The batter will be thick. Spread it evenly into the prepared pan. Spray your hands with cooking spray and use them to pat the mixture down evenly.
-Combine the topping ingredients in a small bowl; sprinkle evenly on top of batter.
-Bake about 30 minutes or until surface springs back when gently pressed. (I have found that they appear to be underdone when they are ready to come out of the oven.  They do continue to firm up in the pan, and will get crunchy if you cook them too long.  Just have faith!)
-Let pan cool before cutting.
Makes 20 to 24 bars
 
Blog Template by suckmylolly.com : Header Image by Roctopus